

The Claude Code CLI is shifting development from browser-based prompts to autonomous, terminal-driven workflows. This guide covers the practical commands, context management techniques, plan mode, subagents, custom slash commands, and the Superpowers framework that Senior Engineers need to use Claude Code in production-grade projects.
Having worked with the Claude Code CLI (with similar CLI products such as OpenAI Codex and Grok Build) and other enterprise-level AI coding tools over the past few years, I want to share my perspective on how to use Claude Code effectively in day-to-day engineering work. The goal of this article is to help fellow developers integrate the Claude Code terminal interface into their workflows with precision and control.
This guide is written for developers who want to move beyond browser-based prompts and start building production-grade workflows with autonomous AI agents directly from the command line.
How to Set Up Claude Code for Production- Grade Workflows?
Initialising Claude Code with the /init Command
Before you begin coding, it is worth establishing a clear "source of truth" for the AI to reference.
- The /init Command: Run this inside your project root. It generates a CLAUDE.md file that anchors Claude's understanding of the codebase.
- The Multi-Repo Root: Rather than launching Claude inside a single microservice folder, launch it at the Git root of your entire project ecosystem and run /init there.
- /add-dir: Use the /add-dir command inside the interactive terminal to expand your workspace without restarting the session.
- OS Setup: On Windows (PowerShell), create a shortcut with the "Start in" property set to your development root.
Structuring Your CLAUDE.md File
Think of CLAUDE.md as the system memory for your project.
- The Strategy: Only include project-specific, non-common knowledge.
- The Reasoning: Claude already understands concepts such as clean code or SOLID principles. Loading the file with thousands of words of generic philosophy simply consumes your token budget without adding value.
- What to Include: Specifics such as "We use Port 5001 for the Auth service" or "Always use the Polly library for retry logic."
Managing Sessions and Context in Claude Code
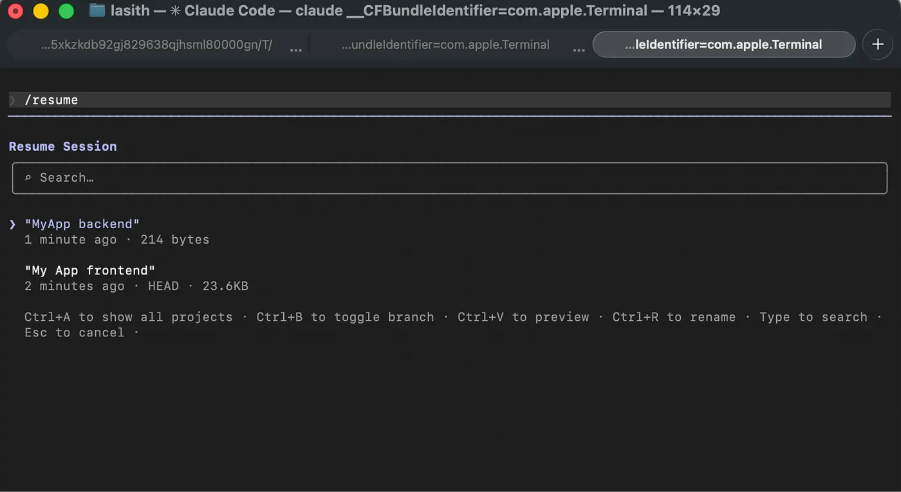
Saving and Resuming Sessions with /rename and /resume
Managing your working memory is essential when collaborating with an AI agent.
- Save and Resume: Use /rename to store your current session and /resume to pick up exactly where you left off.
Proactive Context Management
The Risk of Context Degradation
Context degradation occurs when the AI's active memory becomes saturated with noise, such as long logs or heavy file outputs. As capacity crosses 50–70%, large language models can experience what is known as "Context Rot." The model begins to favour the most recent text whilst losing sight of earlier architectural guidelines, which leads to "Needle in a Haystack" failures where the agent misses critical code details.
Automated vs. Manual Compaction
To keep working memory clean, Claude Code uses a dual approach:
- Auto-Compaction: Claude Code automatically offloads old logs and raw tool data to disk, triggering background summarisation when the context fills up.
- The Manual /compact Override: Relying solely on automation is suboptimal, as the memory is often bloated by the time it triggers. Running /compact manually performs the same function as automated garbage collection. It uses a fast background model to condense the session into a dense summary of active constraints and file states, discarding conversational overhead in the process.
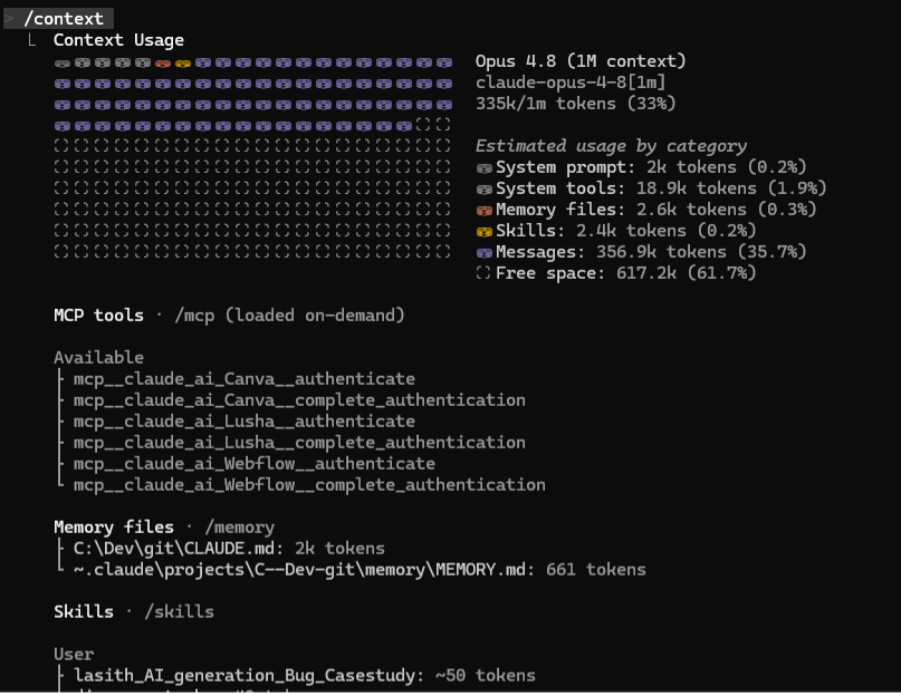
Visualising Context Usage with the /context Grid
Working without visibility into your AI's working memory is rarely productive. If Claude starts producing vague responses or drifting away from instructions, it usually indicates that the conversation has grown heavy. To see precisely what is consuming your token budget, type /context directly into the CLI.
Running /context outputs a colour-coded grid inside your terminal that provides a precise breakdown of your token distribution. It shows exactly how many tokens are being consumed by your chat history, attached code files, system prompts, or loaded MCP tools.
Monitoring Token Usage with the Status Bar
A persistent status bar at the bottom of your terminal allows you to monitor context usage in real time.
- How to Enable It: Run the command /statusline. You can provide natural language instructions, for example:
- /statusline show model name and context percentage, hourly and weekly usage limits with a progress bar
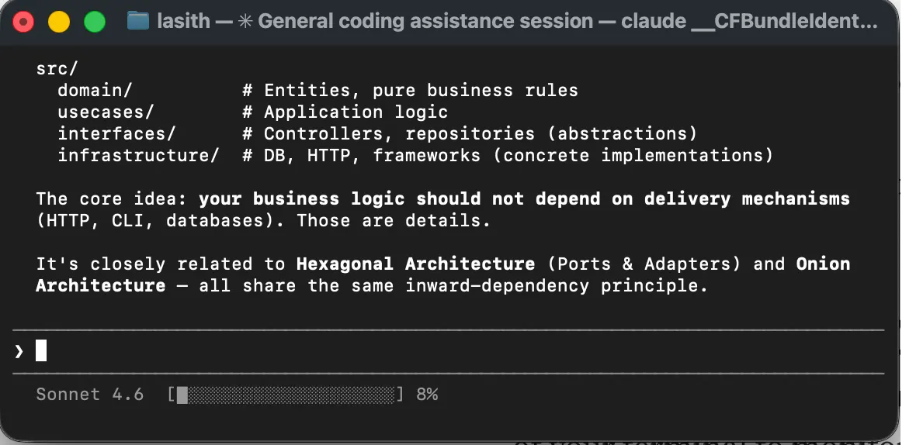
- Visualising the Data: Once enabled, you will see a subtle bar at the bottom of the terminal showing your current model (for example, Sonnet) and a percentage (for example, Context: 42%).
- Tip: If usage climbs above 80%, it is time to run the /compact command.
The Agentic Core Loop: Plan, Code, Verify
For a Senior Engineer, typing is the easy part. The real value lies in the thinking.
H3 - How to Enable Plan Mode and "Think Hard" Triggers
You do not want Claude to begin writing code immediately. You want it to reason through the problem first.
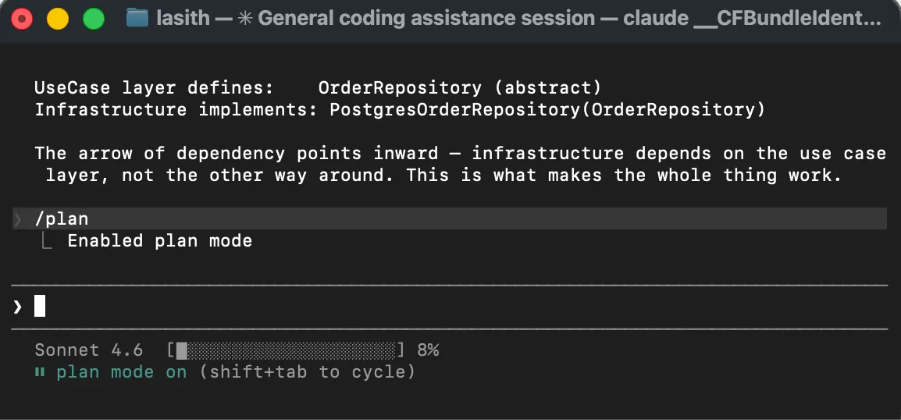
- Keyboard Shortcut: Press Shift + Tab twice to cycle through modes until you see ⏸ plan mode on at the bottom.
- The Command: You can also type /plan directly into the prompt.
- Think Hard: To prompt Claude into deeper reasoning, use thinking triggers. Adding a phrase such as "think hard about the architectural impact" to your prompt activates the "Think Tool," where Claude creates a hidden scratchpad to validate rules and edge cases before writing the first line of code.
Avoiding the "Kitchen Sink" Anti-Pattern
This is one of the most common traps developers fall into. You fix a bug in the backend, then, without clearing the state, you ask Claude to update a README, then refactor a React component.
The Problem:
- The AI's attention mechanism begins to draw spurious conceptual connections between your SQL queries and your CSS styling.
The Solution: Surgical State Management with /clear, /compact, and /rewind
- /clear: Use this between unrelated tasks to reset the context.
- /compact: This performs automated garbage collection. It uses a secondary, lower-cost Haiku model to extract the key architectural decisions and discard conversational noise.
- /rewind: If Claude makes a mistake, use /rewind to return to a clean state of your project.
Claude Code Security: Understanding YOLO Mode and Its Risks
Claude Code operates under a "Zero-Trust" policy, prompting for approval on every command. YOLO Mode allows you to bypass this behaviour.
- The Flag: claude --dangerously-skip-permissions
- What It Does: This mode auto-approves every action, transforming Claude from a cautious assistant into a fully autonomous agent.
- The Risk: It bypasses all safety blocks. There are documented cases of developers losing entire home directories because a hallucinated rm -rf command was auto-executed. Use this only in isolated environments.
Advanced Customisation: Configuring .claude/settings.json
You can configure permission rules manually. By editing .claude/settings.json, you can whitelist specific read-only commands such as git log, ls, or find. This removes the constant permission prompts without exposing you to the full risk of YOLO mode.
Remote Control and Background Dispatch in Claude Code
Claude Code allows you to bridge the gap between your workstation and other devices.
- /remote-control: Generates a secure link that you can open on your phone to monitor a long-running test suite or prompt Claude whilst away from your desk.
- /dispatch: Whilst /remote-control is intended for interactive sessions, /dispatch is designed for delegation. It triggers a task as a background job, effectively saying, "Here is a task, execute it in the background and let me know when it is complete."
Subagents vs. Inline Execution: Choosing the Right Strategy
When handling a substantial refactor (for example, upgrading from .NET 6 to .NET 8), Claude offers two execution paths:
- Subagent-Driven: Claude acts as a project manager, spawning sub-agents for individual tasks. This approach is faster, supports parallelism, and prevents an error in one file from disrupting the entire session.
- Inline Execution: Tasks are executed sequentially in the main thread. This is simpler to follow and better suited to surgical changes where you want to approve every line.
Monitoring Claude Code Usage and Token Costs
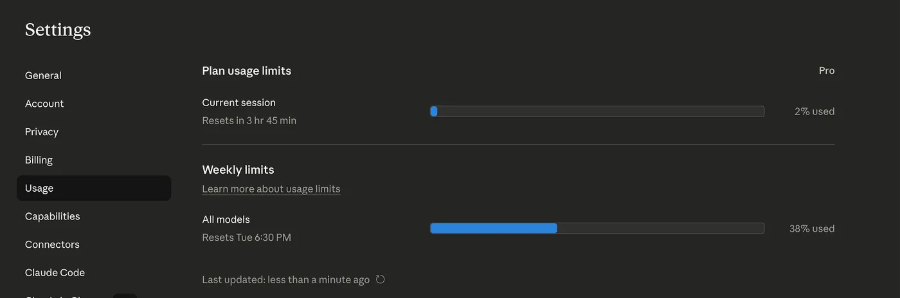
If you find yourself reaching rate limits, you can review your official consumption on the Claude website.
- Path: Go to claude.ai → User Profile → Settings → Usage.
- /cost: Use the /cost command inside the terminal to see the estimated token cost for your current session. This helps you decide whether it is time to /compact or /clear.
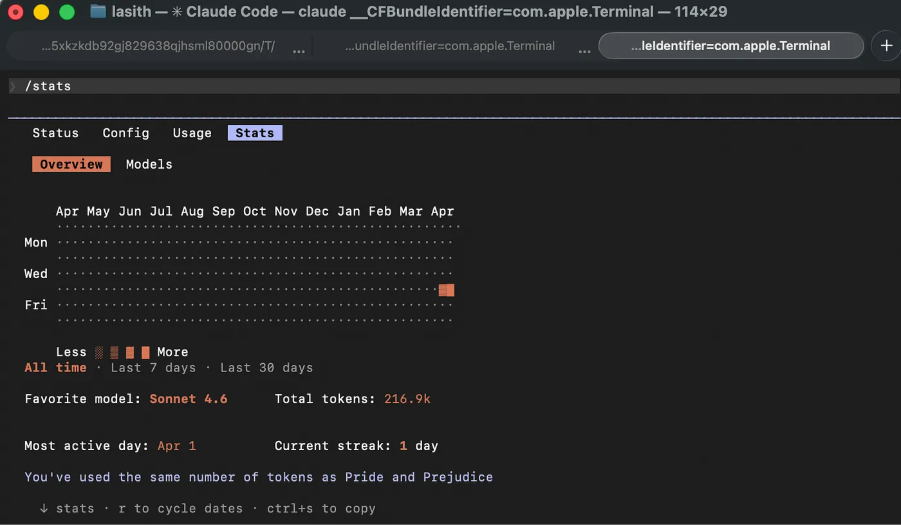
- /stats: Use this to view daily usage, session history, and streaks. It is a useful way to visualise your productivity patterns.
How to Create Custom Slash Commands in Claude Code
As your workflow matures, you will find yourself repeating the same complex prompts. You can automate these by creating your own slash commands.
How to add a Command File to the .claude/commands Folder?
To create a custom shortcut, create a .md file inside the .claude/commands/ directory for project-specific automation, or in ~/.claude/commands/ to use it across all repositories on your machine. The filename you choose automatically becomes the slash command name in the CLI.
Writing Instructions and Passing Arguments
Inside the Markdown file, write out the explicit prompt instructions you want Claude to follow. You can make these scripts dynamic by including the $ARGUMENTS placeholder, allowing you to pass variable text when you run the command in your terminal.
Two practical, production-ready workflows you can build:
- Automated Branch Reviews (/review): Create a file at ~/.claude/commands/review.md. Inside, instruct Claude to generate a Git diff between your current working branch and main, and analyse those changes for potential defects, project-specific rules, edge cases, or optimisations. You can then trigger this localised audit anywhere by typing /review.
- Out-of-Scope Task Deflection (/todo): When refactoring code, it is common to spot unrelated side-bugs or clean-ups that fall outside the current scope. Rather than allowing them to disrupt your focus and introduce the "Kitchen Sink" problem, create a .claude/commands/todo.md script. When you encounter a side-issue, run the command and Claude will analyse the snippet and generate a structured title and description for a new ticket, keeping your active development space free of distractions.
Pro Tip: You can extend both of these workflows by connecting Claude to GitHub, Jira, or Azure DevOps via the Model Context Protocol (MCP). This allows your custom commands to post comments directly onto an open PR or create live cards on your team's project board without you ever shifting focus from the terminal.
Unlocking Superpowers: A Structured Workflow for Claude Code
Whilst standard Claude Code is capable, it can occasionally be too eager and write code before fully understanding the architecture. Superpowers are a set of specialised skills that enforce a rigorous, professional engineering lifecycle.
What Are Claude Code Superpowers?
Think of Superpowers as guardrails for excellence. They break development down into discrete gates: Brainstorm → Plan → Execute → Verify. You cannot move to the next stage until the current one is complete.
Brainstorming Architecture with /superpowers:brainstorm
This is a structured planning mode. Rather than agreeing with your initial idea, Claude takes on the role of a sceptical lead architect.
- How It Works: When you run /superpowers:brainstorm, Claude enters a dedicated dialogue mode. It asks clarifying questions one at a time, focusing on edge cases, tech stack trade-offs, and success criteria.
- The Goal: It compels you to define a design document before a single line of code is written. This prevents the familiar "I forgot about mobile responsiveness" realisation three hours into the build.
Generating Detailed Plans with /superpowers:writing-plans
After brainstorming, you use /superpowers:writing-plans. Unlike the standard /plan command, a Superpowers plan is highly detailed:
- It breaks the work into 2–5 minute micro-tasks.
- It specifies exact file paths and terminal commands for every step.
- It includes the complete failing test for each task (strict TDD).
Additional Claude Code Commands Worth Knowing
Analysing Your Workflow with the /insights Command
Think of /insights as a personalised coding coach that analyses your behaviour over the past 30 days.
- How to Run It: Type /insights in the CLI.
- The Output: Claude scans your local session logs (nothing is sent to external servers for this) and generates an interactive HTML report, usually located at ~/.claude/usage-data/report.html.
- What It Reveals: It identifies friction points (tasks where you struggled or where Claude made repeated mistakes). It also suggests new rules for your CLAUDE.md based on instructions you find yourself repeating.
Running Automated Code Reviews with /review
Whilst working within a session, you can ask Claude to act as a senior reviewer.
- How to Run It: Type /review (or /review <file_path>).
- What It Does: Rather than simply checking syntax, it looks for logic errors, security vulnerabilities, and violations of the rules you have set in your CLAUDE.md.
The terminal is no longer just a place to run commands but where you can collaborate with an agentic partner.
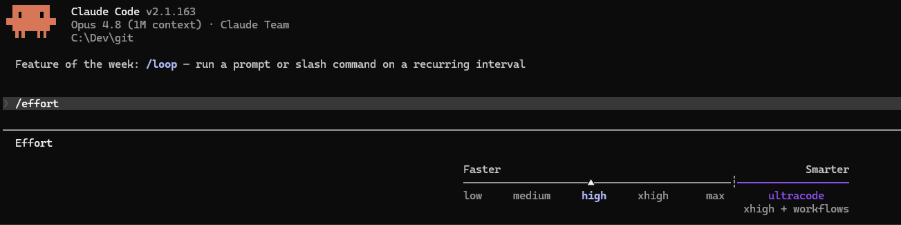
Model Selection & Thinking Effort
To truly operate at an enterprise grade, you need to route your token budget intelligently. You can manage this dynamic control using two core commands:
- The /model Command: Use this to switch your engine immediately based on task complexity (e.g., using a premium model like Opus/Sonnet for heavy architectural tasks, or shifting to Haiku for quick scripts and text formatting).
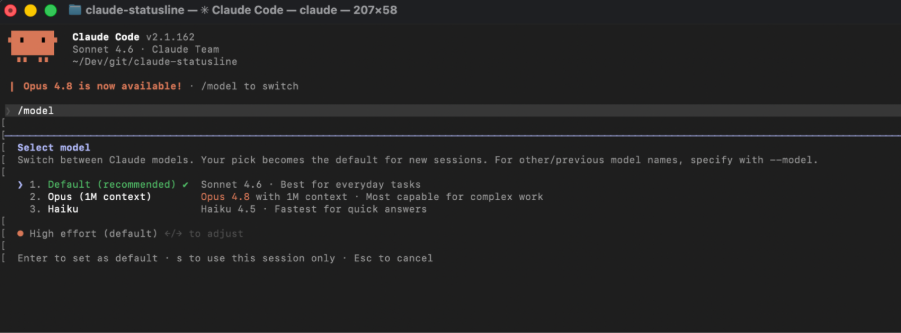
- The /effort Command: Alongside model selection, you can dynamically dial Claude’s adaptive reasoning depth using the inline /effort command. The available options are low (fewer tokens, faster), medium, high, xhigh (more tokens, more intelligence), and max (depending on the slected model). Adjusting this parameter gives you precise control over the model's thinking budget and response speed.